Blackberry V-Trellis Construction
This short step-by-step guide is to help new growers build a V-trellis
for growing blackberries. The supplies needed and the steps to build the
trellis are included. This guide was developed by a tlaented group from NC Cooperative Extension (Nancy Power and Paige Burns), Sandhills Research Station (Jermy Martin) and the Sandhills AgInnovatoin Center (David Goodwin). Their contact information is at the end of this blog post.
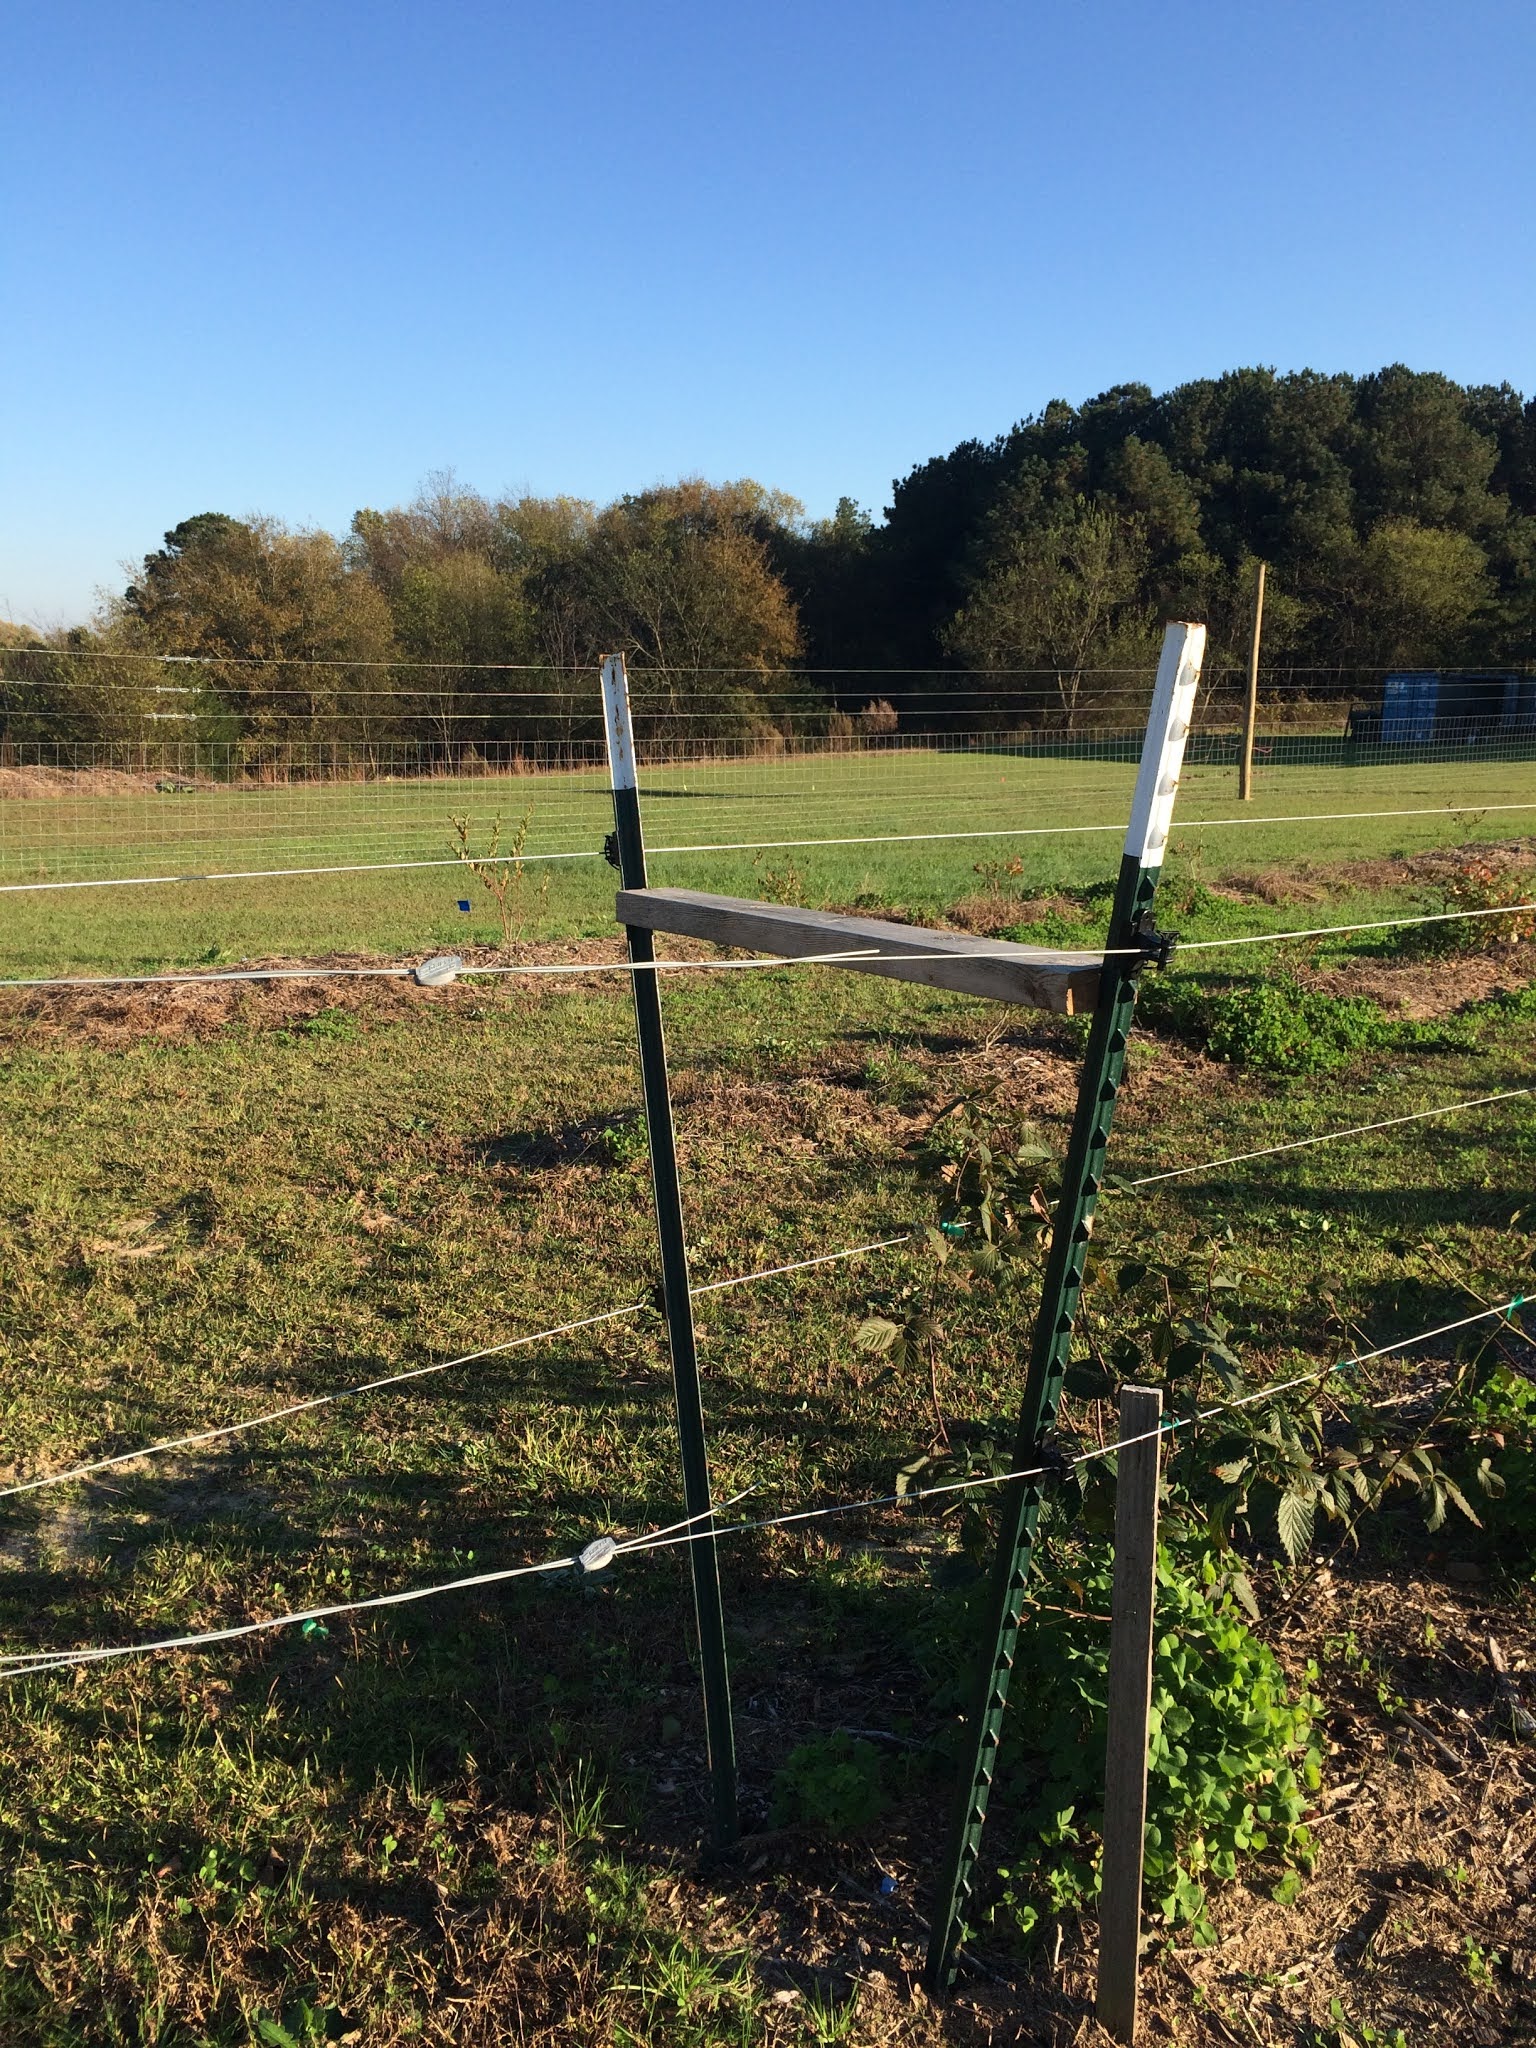
Figure 1. Blackberry V-trellis with 30" board to keep T-posts separate.
Supplies:
|
Item(s) |
unit cost ($) |
cost per 100’ row (rounded to nearest $) |
|
two 8’ round, wooden end posts, 4” diameter |
10 |
10 |
|
eight 6’ steel T-posts* |
5 |
40 |
|
400+ feet 12-gauge galvanized wire |
$105/1000 ft |
11 |
|
two 2 x 4 boards, 23-30” long |
$10/10 ft |
4 |
|
16 T-post pin-lock insulators |
$10/bag of 25 |
7 |
|
2 gripples |
$31/pack of 20 |
3 |
|
floral tape |
2 |
2 |
|
4 galvanized barbed staples or poultry staples |
$4/bag of 52 |
0 |
|
total cost per 100’ row |
|
$72 |
Tools:
- 100’ or longer measuring tape
- spinning jenny
- gripple tightening tool
- pliers
- post pounder
- tapener
- watering can or water bottle or hose
- shovel
- hammer or mallet
*If row is 100’ or less, T-posts can be up to 35’ apart in the row; if row is >100’, 25’ apart is the recommended maximum.
Procedures:
Wear safety glasses, especially for hammering the posts and working with the wire.
1. End post (Figure 2).
a. At each end of the row, insert an end post into ground about 6’ from the end berry plant by one of the following methods:
i. Pound post in with a pile driver
ii. Dig or auger hole 3’ deep
b. Insert post and have one person hold it upright
c. Add a little soil to the hole
d. Pound soil in hole with the handle end of a shovel
e. Add a little water
f. Repeat the above three steps until the hole is full and packed in tightly (about four rounds).
 |
| Figure 2. Metal T-post brace hammered into wooden 8' end post. |
2. Row posts (Figure 3).
a. Using measuring tape, lay T-posts out at 25-35’ intervals, starting at 2’ beyond the end plants (4’ in from end posts). If the row is 100’ or shorter, the spacing can be up to 35’. If the row is longer than 100’, a 25’ spacing between posts is recommended.
b. Set up a brace post (Figure 2):
i. Insert a T-post in the ground about 16” in from the end post, with the base of the T facing the end post, angled so that it the T-post extends past the end post.
ii. Pound the T-post into the ground at an angle until the top is next to the end post.
iii. Push the top of the T-post so that it is inside the end post.
iv. Use the side of the post pounder or a mallet to pound the T edge into the wood.
v. Repeat for the other end post brace.
c. Use the post pounder to insert the other T-posts 25-35 feet apart, in pairs, at a 20-30° angle so that each pair makes a “V.” (See Figure 16a in Southeast Regional Caneberry Production Guide)
d. Use pliers to attach 2 insulators on the outside of each T-post, one at the 5th notch down on the post, and one at the 16th notch (roughly at 4’ and a man’s knee height), with the pin at the top. Put the pin in the hole of each insulator.
e. Turn the L-shaped rods inward on the spinning jenny and add a roll of 12-gauge fence wire. Turn the L-rods back outward over the wire.
f. Pull on one end of the wire to wrap the wire around the outside of the end posts and T-posts at knee level, threading the wire through the insulators as you go.
g. Where the ends of wire meet, thread each end through the gripple, allowing for “tails” on both ends of the wire.
h. Use the gripple tool to ratchet the wire fairly tightly, but not as tightly as possible. After the posts set (in a few weeks), the wires can be tightened further.
i. Insert a 2x4 horizontally between the T-post pair at each end of the row. Push the board down till it fits tightly between the T-posts (Figure 1). You may want to size and cut the board after the rest of the trellis is assembled, to make sure it fits.
j. At the outside end of each end post, hammer a staple in far enough to hold the wire in place vertically but to allow the wire to move horizontally for tightening.

Figure 3. Pow posts: 6' metal T-posts with 12-guage wire running through black plastic insulators facing outward.
If desired, the lower wires can support ¼” irrigation hose.
This construction guide was repared by:
Jeremy Martin, Research Operations Manager, Sandhills Research Station, 910-974-4673.
Nancy Power, Commercial Horticulture Agent, NC Cooperative Extension, Richmond County Center, 910-997-8255.
Davon Goodwin, Manager, Sandhills AgInnovation Center, 910-992-8176.
Paige Burns, County Extension Director, NC Cooperative Extension, Richmond County Center, 910-997-8255.
Reference:
Fernandez, G.E., E. Garcia, D. Lockwood. 2016. Southeast Caneberry Production Guide. AG-697. https://content.ces.ncsu.edu/show_ep3_pdf/1604932460/22996/
No comments:
Post a Comment